


enjoy it!
FUNCTIONALITY LOG
FUNCTIONALITY LOG | October 2025
Index
Objective of the manual: General presentation of Hype Software
Distinction between POS (Point of Sale) and Back Office Technical Support
The Hype Soft manual helps professionals configure, manage, and master their management software.
Clear and practical, it presents the key modules: Back Office, POS, products, menus, stocks and reports for quick setup and optimal use of Hype Software.
Over 2,000 features!

-
Index
-
Objective of the manual
-
General overview of Hype Software
-
Distinction between POS (Point of Sale) and Back Office
-
Technical assistance
-
The Hype Soft manual is designed as an intuitive guide to assist new users in setting up their database and getting to grips with the Hype Software.
It presents in a clear and structured manner all the essential information relating to the functionalities of the system, whether it be the configuration of the Back Office, the use of the POS (Point of Sale), or the management of products, menus, stocks and reports.
A true reference tool, this manual allows you to quickly master each module of the software and get the most out of it from the very first uses.
PART 1 BACK OFFICE
-
Suppliers Module
-
Product Module
-
Warehouse Categories
-
Products Goods registration Goods issue
-
Disposal, Inventory (stock review), Production, Relocation (stock transfer)
-
-
Menus
-
Extras
-
Main categories
-
Menu Categories
-
Items
-
Cash Register Module
-
-
System settings
-
Tables
-
User roles
-
Employees
-
Information Module
-
PART 2 POS (Point of Sale) Interface
PART 1 BACK OFFICE
startup
The default access password is 1234
This is the administrator password, that is, a password with full privileges.

POS | back office
The POS section corresponds to the part used for recording sales, the Back Office is where the software is administered.

Login and access
Upon startup, the software displays a statistics screen.
No action is required on this screen.
Suppliers | Warehouse
For customers using a warehouse with products and item recipes, the first step is to access the Suppliers → Supplier List module.
In the upper right corner, click on Create a supplier to register partners (companies from which goods are purchased).

IMPORTANT: All fields must be completed (except for the Export Number field).
Once the supplier information has been entered, click on Create in the top right corner to validate.

Warehouse, products, product recipes
For customers using a warehouse with product and item recipes.
Once the suppliers are created, we move on to the Products module. This module is directly linked to the establishment's warehouse.

Main Warehouse
By default, a primary warehouse is already created.
From the Create a warehouse option, you can create other warehouses according to the way your establishment operates.
Product categories
These are the product categories in the warehouse.
They allow the raw materials delivered to be organized according to their nature.
⚠️ These stock categories do not correspond to the categories visible to the server in the POS section.

The products
The products represent the raw materials supplied to the establishment.
These products are then used to create the recipes for the articles.
Example: the products are tomatoes, cucumbers, onions, etc., while the Caesar salad is a finished product.

From the top right corner, click on Create a product and fill in the fields as follows:
Product name: The name of the raw material, as it should appear in the inventory.
Product measurement unit: The unit used must be the same as that used in the recipes (kg, litre, piece, etc.).
VAT Group: Value Added Tax rate applicable to the product at the time of its procurement.
Category: Select the warehouse category to which the product belongs.
Warehouse: The warehouse where the product must be available. The same product can belong to several warehouses.
Minimum quantity: Optional field, for informational purposes only.
Packaging: This is a mandatory element when creating a delivered product. The Create Packaging option allows you to define the different forms in which the product arrives at the establishment (for example, a 1 kg package).

Example: a 1 kg package. Next, the relevant supplier is selected. If the same product is supplied by several suppliers, a second package corresponding to another supplier must be added. The purchase price including VAT is associated with the quantity of the package and is taken into account when calculating the cost price of items with a sales receipt.
Tags: These are used when scanning documents during the registration of goods. Specifics of document scanning:
1. The product name must match at least 50% of the name appearing on the document. If this is not the case, tags must be created.
Example: if, in the stock, you group Coca-Cola, Fanta and Sprite under the general heading Non-alcoholic drinks, you must create tags corresponding to each name as it appears on the invoice.
2. To add a tag, enter the name in the field provided, then press Enter.
3. Documents printed on dot matrix printers cannot be scanned by the software.

Productions
A product made in-house is one that is not delivered by a supplier (for example: sauces, pasta, cakes, daily specials). These products are prepared in advance, not when the customer places their order.
Creation of a production
From the top right corner, click on Create a product and fill in the fields as follows:
Name, unit of measure, VAT group, warehouse, category
Packaging is ignored, as it only concerns products purchased from suppliers.
From the "Add a production" section , you create the recipe corresponding to a defined batch (for example: one cake = 10 slices). To create a production, you must first have saved all the products that make up its recipe.

Once the products are created:
Products can be filtered by category, warehouse or supplier (using the arrow next to the search field).

The product list can be exported to Excel (from the three dots in the top right corner → Export to Excel ).
The file contains the following columns:
-
Product Name
-
Warehouse, Quantity
-
Unit of measurement
-
Cost price excluding VAT for the corresponding quantity
-
Currency
-
Barcode
-
Product category and ingredients used for production (for products manufactured in-house).
.png)
-
In the product list, the pencil icon to the right of each product allows you to edit the product information.
-
The only element that cannot be changed for a product is its unit of measurement.
-
If a modification is necessary, the product must be deleted and recreated.
Goods
This section concerns the entry of product quantities upon receipt of a delivery at the establishment.
-
In the top right corner, select New registration → Via delivery note .
-
A list of all suppliers appears. After selecting a supplier, click Add packaging to display the products and their packaging associated with that supplier.


-
Goods
This section concerns the entry of product quantities upon receipt of a delivery at the establishment.
-
Document scanning for registration. Simply photograph the delivery document in a compatible format. From there, the software takes care of the scanning (so we don't need a special program for this);
-
The software then automatically scans the data, without the need for a specific program.


Manual entry of goods from Add packaging, check the products previously created.
You can select multiple products at once, not one by one.

-
Goods
This section concerns the entry of product quantities upon receipt of a delivery at the establishment.
-
In the list of selected products, enter the quantity received for each.
-
The “Number” field accepts decimal values and not only integers.
-
The " Price excluding VAT" and "Price including VAT" fields refer to the unit price of the packaging, while the "Total excluding VAT" and "Total including VAT" fields represent the total value delivered. Simply enter the total amount shown on the delivery note (for example, 100 units including VAT).
-
The software automatically calculates the other fields. Once the quantity and corresponding purchase price are entered, the software automatically saves this value.
-
For future records, the last purchase price will be displayed as a reference.
-
The Batch Number and Expiry Date fields are not mandatory, but if you decide to enter this information, it is important to know that the Information module keeps a report of expiry dates.
-
This report can be presented during an official inspection by the National Food Safety Agency. Depending on the format requested by the authorities, this information can be exported to Excel and then printed or sent by email.
-
The goods registration document can be saved using the Save button , but this does not yet mean that the quantities have been added to the warehouse. Saving a document simply allows you to return to it later to modify or delete it.
-
Once the "Check and save merchandise" option is selected, the merchandise is added to the warehouse and the document becomes locked (it can no longer be modified). If you make a mistake during data entry, please contact our support center.
-
The recording date corresponds to the day the quantity is added to the warehouse.
-
It is not possible to register a delivery with an earlier date.

-
Goods
The goods issue is the reverse operation of the recording. Just as it is possible to add quantities to the stock, it is also possible to remove them via the issue module.
Goods
The operation is identical to a goods issue, but it applies to products intended to be discarded (losses or damage).
Goods
In the top right corner, click on New inventory.
Select the warehouse where the inventory will be performed.
Inventory date – The software asks for the date the inventory was carried out, i.e. the date on which the quantities were physically counted.
If the quantities were counted the day before, but have not yet been entered into the software, it is possible to do so later by specifying the date and time of the count when creating the inventory.
If the current date is selected, the software will generate the quantities based on the stock at the time of recording.
The review can be carried out on specific products or on entire categories.

Products | Menus
This section allows you to create batches of "homemade" products (products from the Production module).
Each production generates a specific batch with complete traceability, depending on the products and quantities defined in the corresponding recipe.
Stocks
This function allows a given quantity of a product to be transferred from one warehouse to another.
For example, moving 10 kg of flour from the main stock to the kitchen stock.
Back Office | pos

Menu Module
The Menu module is used to create and organize the main menu. All items created here will be visible and usable by the servers in the POS.
Back Office | POS
By default, a main menu is already created. It is possible to add other menus later (for example: Daily Menu, Summer Menu, Drinks Menu).
Each menu may have a specific validity period (start and end dates).
Once the period has expired, the menu becomes invisible to the server.
It is also possible to activate or deactivate a menu manually, depending on the needs of the establishment.


Menu Module
This section allows you to create add-ons or options (for example:
“cheese”, “sauce”, “extra meat”) can be attached to a main article.
The supplements created cannot be ordered separately; they must always be associated with an existing item.
Menu Module
The main categories group together the major sections of the menu, such as Bar and Kitchen. Each can contain several subcategories.

Menu Module
Menu categories are subcategories linked to a main category.
(e.g.: Salads, Main Courses, Desserts).
Click on Create a category, enter the name of the subcategory
(for example: Salads, Main Courses, Desserts).
Each subcategory must be assigned to a main category
(e.g.: Salads → Kitchen, Soft drinks → Bar).
It is possible (optional) to associate each category with a kitchen printer or a KDS (Kitchen Display System).
Select an identification color for the category, then click Create.
The categories can be rearranged manually. The order in which you arrange them will correspond to the display order in the POS (sales interface).


Menu Module
This section allows you to create all the items, with their recipes and selling prices.
From the top right corner, click on Create an article.
The creation process consists of five steps.
Step 1: General Information
This step is mandatory when creating an article.
Item name – Enter the item name as it should appear on the screen and on the tax receipt.
Menu category – Select the menu category in which the server will find this item.
Preparation time and Production station – These two fields only appear if the restaurant uses a KDS (Kitchen Display System).
These parameters allow you to define on which screen (or production station) the order should appear, and to indicate an estimated preparation time if necessary.
Note: even if the allotted time has passed, the order remains displayed on the screen until validated.
Unit of measurement and quantity – These parameters depend on how the item's price is defined. In most cases, the unit is 1 piece, meaning the recipe and price correspond to one portion. In establishments equipped with scales, the price is calculated per kilogram. The POS system then allows a precise weight to be entered and automatically calculates the corresponding price.
Barcode – Only to be completed if the product is scanned by barcode. If the product and item are identical.
(For example: a Coca-Cola bottle), and since the barcode is already defined at the product level, it is not necessary to re-enter it for the item. When adding the product to the recipe, the barcode is automatically retrieved by the item.
Discount restriction – This option allows you to prohibit discounts on certain items.
Example: items already on sale, or products with regulated prices (tobacco, alcohol, etc.).
When a discount is applied to a full bill, items marked as non-refundable retain their full price.
Displaying remaining portions – The software calculates in real time, based on stock and recipes, the number of portions available for sale. The displayed figure is indicative. If an ingredient is missing, the server will see “0”, but the sale will not be blocked.
This option is particularly useful for items produced in-house.
Printers – If several printers are used in the establishment, a specific printing device can be assigned to each item (e.g., kitchen printer, bar printer, pastry printer, etc.).

Step 2: Recipe
This step involves creating the item's recipe, that is, linking the item to the products in stock. Creating a recipe is not mandatory, but highly recommended for inventory tracking and automatic cost calculation.
Add a product – Select the products that make up the recipe for one serving (if the unit is 1 piece). Once the products are added, enter the weight or quantity used for each ingredient in the Quantity field. It is recommended to include a margin for loss (spill, waste, cooking) rather than entering only the quantity served to the customer. If, in step 1, the unit of measurement is set to 1 kg, the recipe must correspond to the composition for 1 kg.
If the products have purchase prices inclusive of VAT or unit prices defined on their packaging, the software automatically calculates the total cost of the recipe (excluding VAT). It is possible to choose the basis for calculating the cost of goods sold:
Weighted average price
Last recorded purchase price
The cost price corresponds to the purchase price excluding VAT of each ingredient, multiplied by the quantity used in the recipe.
The “Mandatory Ingredient” option allows you to define which ingredients are essential and which can be omitted at the customer's request. Each recipe must include at least one mandatory ingredient.
Example: In a Mediterranean salad recipe, onion can be marked as optional (unchecked box). Therefore, if a customer orders a salad without onions, the server can remove the ingredient directly from the POS system. When the order is placed, the system will indicate to the kitchen that the salad should be served without onion, and the stock will not be deducted for this ingredient.
Add an existing recipe – This option allows you to incorporate a recipe already saved into another (e.g., homemade sauce used in several dishes).


Step 3: Modifiers
This step is optional.
A modifier is a predefined comment or a customization option for the article.
Example: for an espresso coffee, the modifiers can be long, normal or short.
If no modifier is defined, the server may add a manual comment when taking the order.
Step 4: Menus
This step allows you to add the item to the menus in which it should appear.
If the item is not associated with a menu, it will not have a price and will not be visible to servers in the POS.
The same item may appear in several menus with different prices.
(e.g. daily menu, main menu, room service…).
Click on Add and then select the desired menu.
Define the applicable VAT rate.
In the Selling Price field, enter the final price including VAT for the item.
The software automatically calculates the margin and markup rate (%) from the purchase price (cost price) and the selling price.

Formulas for calculating the markup and the margin
-
Profit margin (excluding VAT) = Selling price (excluding VAT) – Cost price (excluding VAT)
-
Markup rate (%) = (Markup ÷ Cost price) × 100
VAT deducted from the price including VAT:
-
For a VAT rate of 8.1%, divide the price including VAT by 1.081
-
For a VAT rate of 2.6%, divide by 1.026
-
Step 5: Supplements
Optional step, useful for adding specific supplements to an item.
If supplements have been created in the Supplements menu, they can be linked here to the relevant article.
Benefits of supplements linked to an item:
When a server selects an add-on, it appears below the main item in the order. This allows the kitchen or bar to immediately know which dish or drink the add-on corresponds to, without needing to provide a manual explanation. If the add-on is added as a separate item, it appears on a separate line, and the server must add an explanatory note.
Once all the steps are completed, click on Create article in the top right corner.

In the list of articles, all created items are visible. The pencil icon on the right allows you to edit an existing article.
To the left of the Search field, an arrow allows you to filter articles by category, with or without a recipe.


In the upper right corner, the three dots allow you to export the complete list of items to Excel, including their recipes (file “recipe book”).
By default, items in the POS appear in alphabetical order.
The order of items in each category can be customized manually.
5. THE POS SYSTEM

Cash register
This module relates to the cash register/tax system used in the establishment.
The module allows you to perform the following operations:
➤ Cash inflows – for example:
“cash fund” or “starting money”.
➤ Cash outflow – if money needs to be withdrawn from the till
(for example, to pay for a purchase).
➤ Tax reports (tax system)
Select the relevant cash register, then choose the desired report type:
Z Report – Daily financial report with reset
Report X – Interim report, without reset
Tax memorandum report – Report for a defined period (example: monthly report).


6. Settings
Billing information
It is recommended to enter your company information in advance (name, address, VAT, etc.).
If you issue invoices via the software, you must define the starting number and the billing range.
If the establishment operates on a self-service basis, activate the Quick Order option.
It is possible to define a default table or room for orders.
A “Show change” option can be enabled as needed.

Seating plan
This section allows you to create the floor plan of the establishment, displayed in the POS section.
You can create multiple zones or rooms, and name each table by number or custom name (e.g., T1, Terrace, Bar…).
To change the table layout, click on Unlock Layout.
Once the changes are made, click Save to save the new layout.

User profiles
The Administrator role has all rights.
The pencil icon to the right of each role allows you to modify permissions.
“Access” indicates that the role has the right to use the function.
“Quick access” grants temporary authorization, validated by the password of an authorized user.
In the top right corner, the Create button allows you to add new custom roles, with specific rights.

Staff members
This section allows you to register operators (staff members).
Click on Create (top right) and fill in the required fields: first name, last name, job title. Select the role corresponding to the employee's permissions.
Enter a 4-digit PIN for system access, or let the software generate one automatically.
The Administrator user corresponds to the initial account whose default password is 1234.
It is strongly recommended to change this code after the first connection.

7. Information
Reports and statistics
This module groups together all the reports and statistics generated by the software.
By default, the displayed period covers a 24-hour cycle, for example:
(From 6:00 AM today until 6:00 AM tomorrow). The period can be adjusted manually as needed (day, week, month, etc.).
Once the period is defined, the report displays all operators who recorded revenue during that period.
For each operator, the table shows the total sales as well as the breakdown by payment method: cash, card, bank transfer, etc. The report also indicates whether any tables are still open and the cumulative amount of unresolved bills.
To the right of each line, a printer icon allows you to print the individual operator's report.
It is possible to block printing until certain notes are closed.
Printing the report does not reset the operator's total sales.
At the top of the report, the following are displayed:
-
The grand total of closed sales.
-
Total after cancellations (storno).
-
The total of unpaid bills.
In the upper right corner, the three-dot menu allows you to export the report in Excel format or print it directly (on a remote printer).

-
PART 2 Interface POS (Point of Sale)
1. System - Information
4-digit PIN code
Access is via a default 4-digit PIN code: (1234). Once logged in, the venue's seating plan will be displayed on the screen. In the top right corner, select the desired room using the "Choose a room" option.


Management
Select the table to which the order should be recorded.
The full menu (main categories and subcategories) is displayed automatically.
Article selection methods:
-
By browsing through the categories
-
Or via the free search bar, without first clicking in the field
Selection of an item with optional ingredients, modifiers and supplements or selection of a simple item, without personalization.


The list of selected items is displayed on the right side of the screen.
Possible actions on each item:
By swiping the article left or right.
Swipe left:
Quantity calculator display (adjust the number of units).
“+” button to increase, “–” button to decrease.
Red trash can icon: delete the selected item.
Select the table to which the order should be recorded.


Swipe right:
Apply a discount percentage to the item (before validation)
Add a comment or save the preparation for a set time
(e.g., serve the dish after 20 minutes).
-
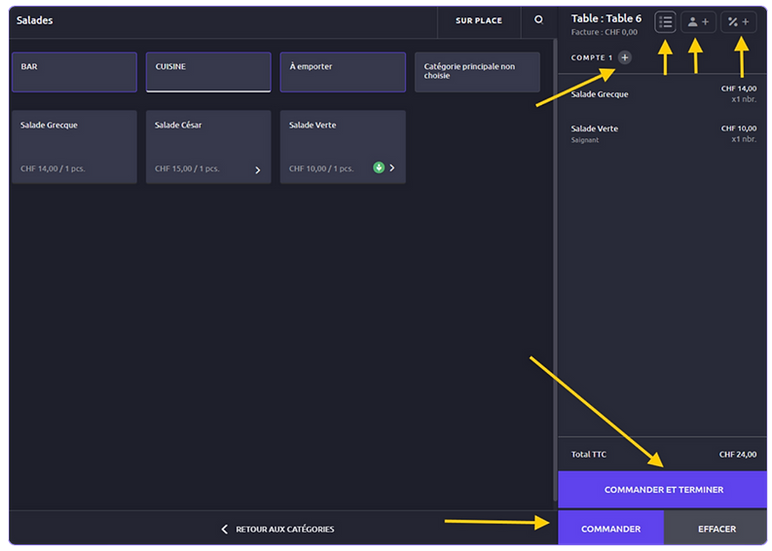
Managing bills effectively
This module allows for efficient management of bills and offers great flexibility in service.
At the top of the list, next to “Addition 1” , the “+” button allows you to add multiple additions to the same table.
(useful if each customer pays separately)
The name of the bill can be freely changed (not displayed on the receipt).
The three-bar icon (top right) displays items already ordered and allows you to add other items without reopening the card.
Customer profile icon – to search for an existing customer (with discount or invoice). If the customer does not yet exist, they can be created directly from the POS (name, contact details, VAT, etc.).
“%” icon – Manual discounts: Allows you to apply an overall discount
Modifiable in Back Office → Settings → Nomenclatures → Discounts.
The module also manages customer deposits that have already been recorded.
Split/redistribute bills → separate or merge bills.
Move the bill to another table → transfer a check to another table.
Item cancellation → delete an item already ordered.
Upon cancellation, the software offers the following options:
-
Return to the warehouse (the products are put back into inventory), or
-
Scrap (brak – recorded loss).
⚠️ Important: Product quantities are deducted from stock at the time of order, not at the time of payment.
Operator change – allows transferring an addition from one employee to another.
Menus – selection of the active menu for ordering.


-
Bills | CLOSURE
This module allows for efficient management of bills and offers great flexibility in service.
Once “Close” is selected:
The POS handles mixed payments (cash + card, etc.).
-
Choose your payment method: cash, card, bank transfer, etc.
-
Click on Close (top right) to finalize the transaction.
-
Split the bill – allows you to divide the bill into several independent payments
(e.g., 3 equal shares with different payment methods)
-
Each payment is processed and validated separately.


-

8. TECHNICAL & COMMERCIAL SUPPORT
An exceptional support team at your side 24/7
+41 22 404 05 55
Brilliant, competent and fully dedicated to your satisfaction, our Hype Soft support managers work every day to offer you responsive and human assistance.
Thanks to Mirado (Administrative Management), Sangy and Sedra (Technical Support), as well as Pamela and Mialina (Sales Support), who passionately run a service available in French, English, German, among other languages, to support you with complete confidence, wherever you are.


A 360° panel
Discover our 360° range of solutions — software, hardware and services — designed to offer you comprehensive and optimized management, consistent actions and measurable results.
And to further support your needs, we offer payment plans over 12, 24 or 36 months, so you can realize your projects with complete peace of mind.
With HYPE, nothing is left to chance.

1
New generation of retail management software
Hype Soft, a comprehensive, intelligent, intuitive, and connected solution designed to boost your efficiency and transform your customer experience. The next generation of retail starts here.
Powerful, seamless, and intelligent, Hype Soft is your next-generation business ally. Your ultimate destination for saving time and adding value to your company.

2
Hype Soft Switzerland enters a new era!
Hype Soft is evolving towards a customer-centric strategy, combining proximity, trust, and performance. More than just management software, Hype Soft is becoming a technology partner dedicated to the success and growth of its users.
-
Product adoption: ensuring a quick and smooth onboarding process
-
Customer satisfaction: delivering measurable value every day
-
Brand promotion: transforming our customers into long-term ambassadors

3
Hype Soft Referral & Loyalty Program
An exclusive initiative to reward and recognize our most engaged customers. You share your experience, we value your contribution.
Join a vibrant, connected, and collaborative community. The Ambassador program is open to everyone, users and non-users of Hype Soft products and services, professionals and individuals alike.

4
Join Team Hype Soft!
You are proactive, solution-oriented, and want to join the Hype Soft team.
Commitment and sharing | Together, we make a difference . At Hype Soft Switzerland, we value creativity, loyalty, and commitment. Thrive in an environment where innovation, collaboration, and opportunity go hand in hand.
5
Hype Telecom – High-Speed Internet & Telephony in Switzerland
Hype Telecom by Hype Soft offers a fast and stable internet connection, included landline telephony and high-speed Wi-Fi accessible everywhere in Switzerland.
Designed for individuals and businesses, this service combines reliability, flexibility and competitive pricing, guaranteeing a smooth, efficient and uncompromising communication experience.

1
New generation of retail management software
Hype Soft, a comprehensive, intelligent, intuitive, and connected solution designed to boost your efficiency and transform your customer experience. The next generation of retail starts here.
Powerful, seamless, and intelligent, Hype Soft is your next-generation business ally. Your ultimate destination for saving time and adding value to your company.
2
Hype Soft Switzerland enters a new era!
Hype Soft is evolving towards a customer-centric strategy, combining proximity, trust, and performance. More than just management software, Hype Soft is becoming a technology partner dedicated to the success and growth of its users.
Product adoption: ensuring a quick and smooth onboarding process
Customer satisfaction: delivering measurable value every day
Brand promotion: transforming our customers into long-term ambassadors
3
Hype Soft Referral & Loyalty Program
An exclusive initiative to reward and recognize our most engaged customers. You share your experience, we value your contribution.
Join a vibrant, connected, and collaborative community. The Ambassador program is open to everyone, users and non-users of Hype Soft products and services, professionals and individuals alike.
4
Join Team Hype Soft!
You are proactive, solution-oriented, and want to join the Hype Soft team.
Commitment and sharing | Together, we make a difference. At Hype Soft Switzerland, we value creativity, loyalty, and commitment. Thrive in an environment where innovation, collaboration, and opportunity go hand in hand.
5
Hype Telecom – High-Speed Internet & Telephony in Switzerland
Hype Telecom by Hype Soft offers a fast and stable internet connection, included landline telephony and high-speed Wi-Fi accessible everywhere in Switzerland.
Designed for individuals and businesses, this service combines reliability, flexibility and competitive pricing, guaranteeing a smooth, efficient and uncompromising communication experience.
1
New generation of retail management software
Hype Soft, a comprehensive, intelligent, intuitive, and connected solution designed to boost your efficiency and transform your customer experience. The next generation of retail starts here.
Powerful, seamless, and intelligent, Hype Soft is your next-generation business ally. Your ultimate destination for saving time and adding value to your company.
2
Hype Soft Switzerland enters a new era!
Hype Soft is evolving towards a customer-centric strategy, combining proximity, trust, and performance. More than just management software, Hype Soft is becoming a technology partner dedicated to the success and growth of its users.
-
Product adoption: ensuring a quick and smooth onboarding process
-
Customer satisfaction: delivering measurable value every day
-
Brand promotion: transforming our customers into long-term ambassadors
3
Hype Soft Referral & Loyalty Program
An exclusive initiative to reward and recognize our most engaged customers. You share your experience, we value your contribution.
Join a vibrant, connected, and collaborative community. The Ambassador program is open to everyone, users and non-users of Hype Soft products and services, professionals and individuals alike.
4
Join Team Hype Soft!
You are proactive, solution-oriented, and want to join the Hype Soft team.
Commitment and sharing | Together, we make a difference . At Hype Soft Switzerland, we value creativity, loyalty, and commitment. Thrive in an environment where innovation, collaboration, and opportunity go hand in hand.
5
Hype Telecom – High-Speed Internet & Telephony in Switzerland
Hype Telecom by Hype Soft offers a fast and stable internet connection, included landline telephony and high-speed Wi-Fi accessible everywhere in Switzerland.
Designed for individuals and businesses, this service combines reliability, flexibility and competitive pricing, guaranteeing a smooth, efficient and uncompromising communication experience.
1
New generation of retail management software
Hype Soft, une solution globale, intelligente, intuitive et connectée, conçue pour booster votre efficacité et transformer votre expérience client. La nouvelle génération du retail commence ici.
Puissant, fluide et intelligent, Hype Soft, votre allié business nouvelle génération. Votre destination ultime pour gagner du temps et apporter de la valeur à votre entreprise.
2
Hype Soft Switzerland enters a new era!
Hype Soft is evolving towards a customer-centric strategy, combining proximity, trust, and performance. More than just management software, Hype Soft is becoming a technology partner dedicated to the success and growth of its users.
Product adoption: ensuring a quick and smooth onboarding process
Customer satisfaction: delivering measurable value every day
Brand promotion: transforming our customers into long-term ambassadors
3
Hype Soft Referral & Loyalty Program
An exclusive initiative to reward and recognize our most engaged customers. You share your experience, we value your contribution.
Join a vibrant, connected, and collaborative community. The Ambassador program is open to everyone, users and non-users of Hype Soft products and services, professionals and individuals alike.
4
Join Team Hype Soft!
You are proactive, solution-oriented, and want to join the Hype Soft team.
Commitment and sharing | Together, we make a difference . At Hype Soft Switzerland, we value creativity, loyalty, and commitment. Thrive in an environment where innovation, collaboration, and opportunity go hand in hand.
5
Hype Telecom – High-Speed Internet & Telephony in Switzerland
Hype Telecom by Hype Soft offers a fast and stable internet connection, included landline telephony and high-speed Wi-Fi accessible everywhere in Switzerland.
Designed for individuals and businesses, this service combines reliability, flexibility and competitive pricing, guaranteeing a smooth, efficient and uncompromising communication experience.
A 360° panel
Discover our 360° range of solutions — software, hardware and services — designed to offer you comprehensive and optimized management, consistent actions and measurable results.
And to further support your needs, we offer payment plans over 12, 24 or 36 months, so you can realize your projects with complete peace of mind.
With HYPE, nothing is left to chance.
1
New generation of retail management software
Hype Soft, a comprehensive, intelligent, intuitive, and connected solution designed to boost your efficiency and transform your customer experience. The next generation of retail starts here.
Powerful, seamless, and intelligent, Hype Soft is your next-generation business ally. Your ultimate destination for saving time and adding value to your company.
2
Hype Soft Switzerland enters a new era!
Hype Soft is evolving towards a customer-centric strategy, combining proximity, trust, and performance. More than just management software, Hype Soft is becoming a technology partner dedicated to the success and growth of its users.
Product adoption: ensuring a quick and smooth onboarding process
Customer satisfaction: delivering measurable value every day
Brand promotion: transforming our customers into long-term ambassadors
3
Hype Soft Referral & Loyalty Program
An exclusive initiative to reward and recognize our most engaged customers. You share your experience, we value your contribution.
Join a vibrant, connected, and collaborative community. The Ambassador program is open to everyone, users and non-users of Hype Soft products and services, professionals and individuals alike.
4
Join Team Hype Soft!
You are proactive, solution-oriented, and want to join the Hype Soft team.
Commitment and sharing | Together, we make a difference . At Hype Soft Switzerland, we value creativity, loyalty, and commitment. Thrive in an environment where innovation, collaboration, and opportunity go hand in hand.
5
Hype Telecom – High-Speed Internet & Telephony in Switzerland
Hype Telecom by Hype Soft offers a fast and stable internet connection, included landline telephony and high-speed Wi-Fi accessible everywhere in Switzerland.
Designed for individuals and businesses, this service combines reliability, flexibility and competitive pricing, guaranteeing a smooth, efficient and uncompromising communication experience.
1
New generation of retail management software
Hype Soft, a comprehensive, intelligent, intuitive, and connected solution designed to boost your efficiency and transform your customer experience. The next generation of retail starts here.
Powerful, seamless, and intelligent, Hype Soft is your next-generation business ally. Your ultimate destination for saving time and adding value to your company.
2
Hype Soft Switzerland enters a new era!
Hype Soft is evolving towards a customer-centric strategy, combining proximity, trust, and performance. More than just management software, Hype Soft is becoming a technology partner dedicated to the success and growth of its users.
-
Product adoption: ensuring a quick and smooth onboarding process
-
Customer satisfaction: delivering measurable value every day
-
Brand promotion: transforming our customers into long-term ambassadors
3
Hype Soft Referral & Loyalty Program
An exclusive initiative to reward and recognize our most engaged customers. You share your experience, we value your contribution.
Join a vibrant, connected, and collaborative community. The Ambassador program is open to everyone, users and non-users of Hype Soft products and services, professionals and individuals alike.
4
Join Team Hype Soft!
You are proactive, solution-oriented, and want to join the Hype Soft team.
Commitment and sharing | Together, we make a difference. At Hype Soft Switzerland, we value creativity, loyalty, and commitment. Thrive in an environment where innovation, collaboration, and opportunity go hand in hand.
5
Hype Telecom – High-Speed Internet & Telephony in Switzerland
Hype Telecom by Hype Soft offers a fast and stable internet connection, included landline telephony and high-speed Wi-Fi accessible everywhere in Switzerland.
Designed for individuals and businesses, this service combines reliability, flexibility and competitive pricing, guaranteeing a smooth, efficient and uncompromising communication experience.
1
New generation of retail management software
Hype Soft, a comprehensive, intelligent, intuitive, and connected solution designed to boost your efficiency and transform your customer experience. The next generation of retail starts here.
Powerful, seamless, and intelligent, Hype Soft is your next-generation business ally. Your ultimate destination for saving time and adding value to your company.
2
Hype Soft Switzerland enters a new era!
Hype Soft is evolving towards a customer-centric strategy, combining proximity, trust, and performance. More than just management software, Hype Soft is becoming a technology partner dedicated to the success and growth of its users.
-
Product adoption: ensuring a quick and smooth onboarding process
-
Customer satisfaction: delivering measurable value every day
-
Brand promotion: transforming our customers into long-term ambassadors
3
Hype Soft Referral & Loyalty Program
An exclusive initiative to reward and recognize our most engaged customers. You share your experience, we value your contribution.
Join a vibrant, connected, and collaborative community. The Ambassador program is open to everyone, users and non-users of Hype Soft products and services, professionals and individuals alike.
4
Join Team Hype Soft!
Vous êtes procréatif, orienté solutions, et souhaitez rejoindre la team Hype Soft.
Engagement et partage | Ensemble, nous faisons la différence Chez Hype Soft Suisse, nous valorisons la créativité, la loyauté et l’engagement. Évoluez dans un environnement où innovation, collaboration et opportunités vont de pair.
5
Hype Telecom – High-Speed Internet & Telephony in Switzerland
Hype Telecom by Hype Soft offre une connexion Internet rapide et stable, la téléphonie fixe incluse et un Wi-Fi haut débit accessible partout en Suisse.
Pensé pour les particuliers et les entreprises, ce service allie fiabilité, flexibilité et tarifs avantageux, garantissant une expérience de communication fluide, performante et sans compromis.
INTEGRATED TRACKING
PRECISION
EASY DEPLOYMENT
INTEGRATED TRACKING
PRECISION
EASY DEPLOYMENT
Strategic Partners


ADVANTAGE & STRENGTH 1
ADVANTAGE & STRENGTH 2
100% SECURE
INTEGRATED TRACKING
PRECISION
INTEGRATED TRACKING
PRECISION
EASY DEPLOYMENT
Strategic Partners